

Security Systems
How To Add Reolink IP Cameras To Reolink PoE NVR

Jan
Applies to: All Reolink IP Cameras
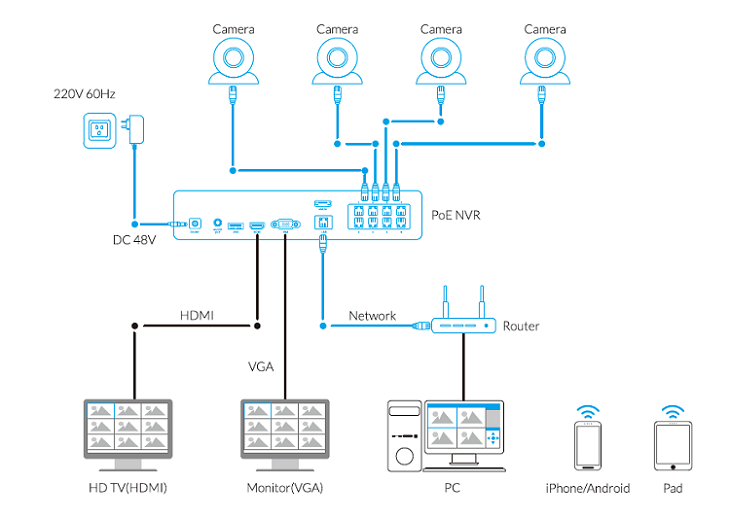
Reolink PoE NVR allows you to record videos for Reolink IP cameras without using a computer. To do that, you need to add the camera to the NVR first. The cabling for PoE NVR is shown as below.
Here is a video for your reference:
You may follow the steps below to add Reolink cameras to Reolink PoE NVR.
Step 1. Connect your Reolink IP cameras to the Reolink PoE NVR. There’re two different ways of powering your IP cameras:
a. Power the IP cameras via the PoE NVR. You may connect the IP cameras to the PoE NVR directly via an Ethernet cable. (An Ethernet cable is also needed during the initial setup for WiFi cameras)
b. Power the IP cameras using a DC power adapter. For PoE cameras, you may connect the camera to the same router that the NVR is connected to; For WiFi cameras, select the WiFi of the router that the NVR is connected to.
Note: Make sure all the IP cameras you want to add to the NVR are connected to the same network (LAN) as the NVR. Otherwise, the cameras won’t be shown on the scanned list and cannot be automatically added to the NVR.

Step 2. Log in to your NVR, and go to the IP channel.
Step 3. Select Auto Add, and click Scan so that all the cameras in the same LAN can be automatically shown on the list.
Note: The number of cameras that can be added to the NVR may vary depending on the NVR channel numbers of the NVR.
Step 4. If you have never changed the password of the IP cameras (the default password of the IP camera is blank) and there are enough channels for all the cameras, you may press Apply to add all the IP cameras to the NVR.

However, if you have changed the login passwords of the IP cameras or there is no spare channel to display all the IP cameras, you may need to go through a few more steps.
Step 5. If you have changed the User Name and the Password of your cameras, please click Modify to input the required information.
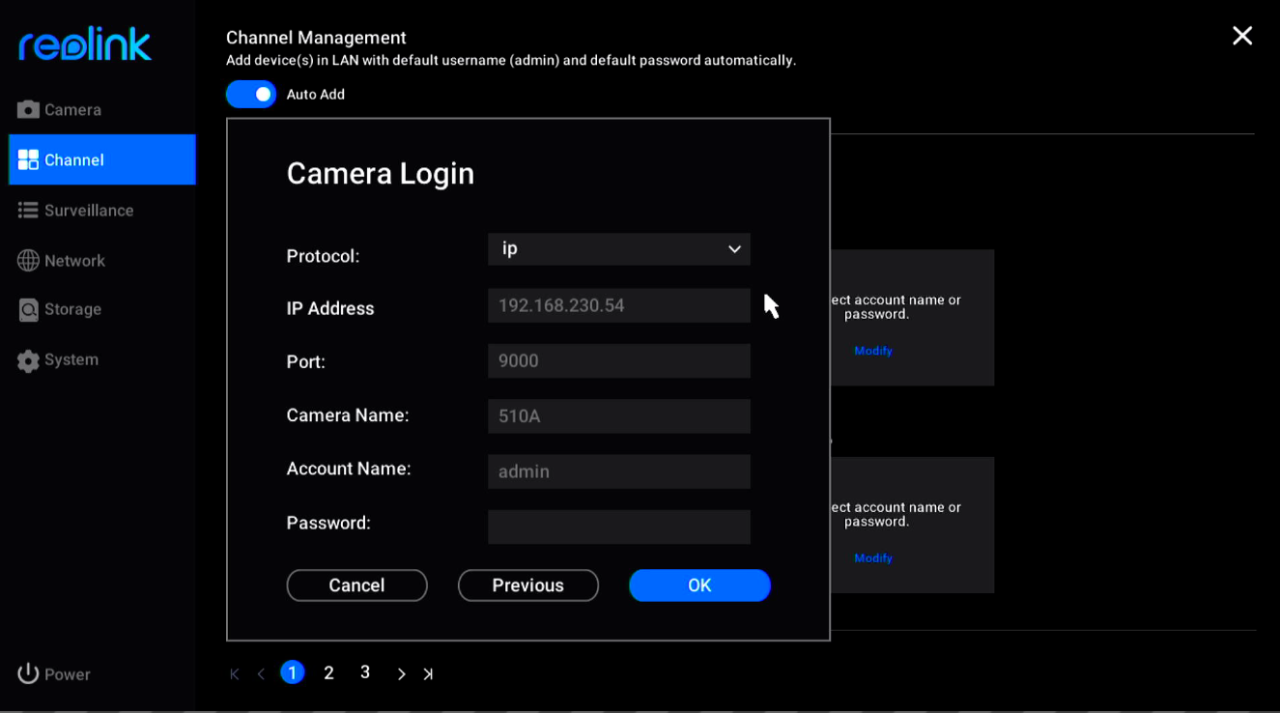
Step 7. Click OK to save the configuration.
Also, here is a video for your reference to add WiFi cameras to PoE NVR: